Welcome to the future of printing technology. We combine state-of-the-art equipment with creative expertise to deliver printing solutions that push boundaries.
The freedom to simply offer more
Everything expected from digital printing and much more. This technology eliminates the need for a static printing form. Digital printing complements traditional printing processes such as offset, gravure, flexographic, or screen printing in all their application areas, especially where the desired short run lengths, down to unique copies (e.g., a single copy), cannot be printed cost-effectively.
With its dynamic print image generation, it opens up the possibility of various types of customization, such as personalization and individualization, at an affordable price.
Spot Varnish
Don't settle for just printed products any longer. Spot varnish and metallic foils for individual areas or surfaces with special effects are a great way to achieve this – both visually and tactilely.
Take your printed materials to the next level visually. Print finishing in perfect quality. Awaken your customers' senses with an additional WOW effect.
For us, white becomes the color
In the past, white printing was only possible with screen or offset printing. Today, we can also produce white digitally in the highest quality. With us, white truly becomes a color that you can use just like any other color.
Is regular white material too boring for you? Are you trying to color material with full-surface printing and are annoyed by the white cut edges? Take advantage of our selection of solid-colored fine papers and still enjoy vibrant colors thanks to the opaque white.
Everything expected from digital printing and much more. This technology eliminates the need for a static printing form. Digital printing complements traditional printing processes such as offset, gravure, flexographic, or screen printing in all their application areas where the desired short run lengths, down to unique pieces (e.g., a single print run), cannot be printed cost-effectively.
With its dynamic print image generation, it opens up the possibility of various types of customization, such as personalization and individualization, at an affordable price-performance ratio.
Spot Varnish
Partial varnishing, also known as spot varnishing, is a paper finishing process in which varnish is applied only partially to the substrate. This allows for various effects such as relief, texture, and gloss.
In addition to the common dispersion varnish, there are even more effective varnishing options, such as texture, relief, or spot varnishing. These varnishes are applied as an additional layer, usually using a special varnishing machine, and result in various effects.
For us, white becomes the color
In the past, white printing was only possible with screen or offset printing. Today, we can also produce white digitally in the highest quality. With us, white truly becomes a color that you can use just like any other color.
Is regular white material too boring for you? Are you trying to color material with full-surface printing and are annoyed by the white cut edges? Take advantage of our selection of solid-colored fine papers and still enjoy vibrant colors thanks to the opaque white.
Printed matter with next level
Print finishing is the treatment of printed products, which can be performed either inline (on the printing press) or in a subsequent process. When printed products are finished using a special process, the reasons lie in both appearance and quality. This allows for unique visual effects: a glossy yellow, for example, always appears more intense than a matte one.
Furthermore, finishing with varnish, for example, makes it possible to protect printed materials from external influences. These include scratches, abrasion, cracks, dirt, or water stains.
This additional protection option is particularly necessary for packaging. Varnishing also offers improved post-print processing.
The very special finish
Partial varnishing, also known as spot varnishing, is a paper finishing process in which varnish is applied only partially to the substrate. This allows for various effects such as relief, texture, and gloss.
In addition to the common dispersion varnish, there are even more effective varnishing options, such as texture, relief, or spot varnishing. These varnishes are applied as an additional layer, usually using a special varnishing machine, and result in various effects.
Gold, silver and metallic
With our silver foils and subsequent reprinting, we are able to achieve all metallic colors. Holographic foils as a security feature are also the ideal complement to protect important printed materials from copying.
Similar to spot varnishing, sleeking allows for partial highlighting or the application of metallic effects in selected areas. Our digital printing system prints the desired motif. These printed sheets are then processed with the sleeking foil on a suitable laminator. The toner surface acts as a kind of "glue" to apply the metallic foil.
alpha-insight
About alpha manufactur 2.0
alpha – a small but fine manufacturer of high-quality print finishing and advertising technology in Bielefeld – the city that verifiably exists!
We are the specialists when it comes to printing and finishing. This includes understanding our customers and recognizing their needs. From brochures to large-format printed products, our motto is "We love print." We can go far beyond the standard repertoire of state-of-the-art printing and digital finishing technologies: with vibrant colors, ultrafine materials, and printed products that have a tactile feel with tangible surfaces, metallic effects, and/or 3D UV varnish.
In addition to production solutions for our business partners, we also advise on design solutions, sheet-fed finishing, and further processing, with numerous technical options. We want to help shape the future and proactively lead the way in digital printing and digital print finishing. We see ourselves as consultants and sources of ideas. We love the challenges that arise every day due to the diverse possibilities and customer demands.
What does alpha manufactur 2.0 stand for?
"alpha" – we strive to be at the forefront when it comes to customer satisfaction and achieving our ambitious goals.
"manufactur" – this name is our motto and represents our sophisticated, creative, and quality-conscious approach to digital printing. Special ideas require special craftsmanship. We want to stand for this special quality and, with this self-image, we dedicate ourselves to fulfilling your every wish.
The team behind it
A company is only as good as its workforce. Qualified and dedicated employees are the key to alpha manufactur's success. They contribute their expertise and passion across all areas. We maintain a strong sense of ownership and high standards for our services and the resulting products.
Cooperation partner
No one who does everything is always truly good at everything. We work outside of our comfort zone with a network of partners with whom we've built strong relationships over the years. Everyone knows what makes each other tick. This allows us to serve as a one-stop shop for everything, because we have other helping hands.
Your contact persons
We are happy to assist you with our extensive team, our experience, and our knowledge!
Phone: +49 521 32 960 888
Email: info@am-2.de
Consulting: Louise Reimann Mail
Back Office: Christine Lohmann Mail
Knowledge pool
Data output
How do I create a PDF file for printing? Here are some helpful tips.
Generally
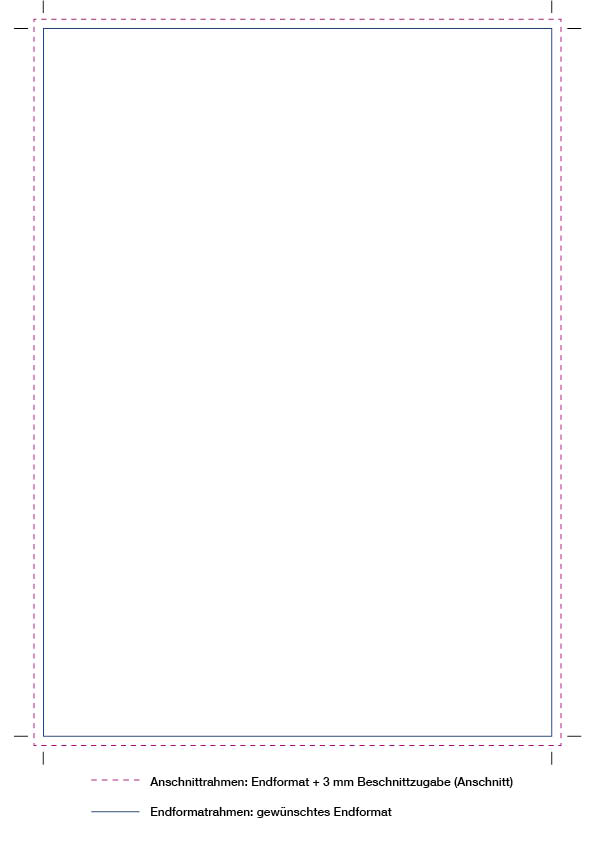
•Always create your print files with a 3 mm bleed on each side (magenta, click on the sketch in the bottom right)!
•We will consider any trim box you create (final format without bleed, blue) and place it centrally.
•Frames, outlines, and text require a 4 mm margin from the edge of the trim box.
•Images and other graphic elements also require this margin. If they are to be printed to the edge, they extend beyond the trim box to the bleed line.
•Fold and crop marks (black) are placed directly on the bleed.
•Other color modes (such as RGB) are automatically converted to CMYK, which may result in color deviations.
•If you are printing multiple types of the same format, please inquire whether it is better to provide individual PDFs or all types in one PDF file.
•For double-sided printing, these rules also apply to the back.
•For multi-page printing, these rules apply to all pages.
Special features
Wire stitching
Please note that the total number of pages must always be divisible by 4. For brochures and magazines, combine all pages as individual pages in a single PDF file, even if the cover is printed from a different material than the interior. Wire-stitched brochures with flaps are an exception.
Wire-stitched cover with flap
The cover side where the flap is to be attached must be 3 mm less wide than the cover side without the flap. The flap must have a minimum width of 80 mm. However, it may not be more than the cover width (to which it attaches) minus 8 mm. The flap can be attached to the left or right. For example: A4 with flap: Trimbox max. 616 mm x 297 mm. Maximum width = 3 x 210 mm minus 3 mm minus 8 mm (in the example, the first page).
Perfect binding - cover
For example: A4 with 96 pages, grammage: 135 g inside, 170 g cover, spine: 6 mm (spine thickness +1.5 mm), trim box 427.5 mm x 297 mm.
Perfect binding - cover with flap
The cover side where the flap is to be attached must be 3 mm less wide than the cover side without the flap. The flap must be at least 80 mm wide. However, it may not be more than the cover width (where it is attached) minus 18 mm. The flap can be attached to the left or right. For example: A4 with 96 pages, grammage: 135 g inner section, 170 g cover, trim box max. 612 mm x 297 mm.
Perfect binding - contents
The cover and entire contents must be delivered as individual pages in a single PDF file. Even with perfect binding, the total number of pages is a multiple of 4. For 100g paper, no fewer than 40 pages are allowed. For fewer pages, please contact us in advance. A perfect-bound brochure cannot be opened to the spine. Overflowing images therefore need some space in the middle: cover to contents, or vice versa: create a trim box for images with a 5 mm gap from the glued edge. Contents to contents: 2 mm is sufficient here. You must create a separate area for the spine. The thickness depends on the number of pages and paper thickness; your customer service representative will tell you the correct size for your project.
Thread-stitched cover
Softcover See: Perfect binding – cover Hardcover Example: A4 with 96 pages, grammage: 135 g inside, 170 g cover A4 + spine: 6 mm (spine thickness +1.5 mm) + at least 30-50 mm bleed all around, trim box 487.5 mm x 357 mm.
Thread stitching - Contents
Please note that the total number of pages must always be divisible by 4. Combine all pages as individual pages in a single PDF file, even if the cover is printed on a different material than the inside.
Technical information
Data transfer
Make sure your data is clearly labeled! Date (backwards: YYYYMMDD), order number (if applicable), customer name, job title, revision number (R01, R02, etc.).
You can also send files up to 18 MB to us via email
(info@am-2.de).
In this case, please be sure to include the following information in the subject line:
Order number, your name or company, project name, revision number (if applicable)
Example: 21_001234_Mustermann_Ltd_Spring_Catalog_R02
For larger data volumes, you can also send them to us via a third-party provider such as WeTransfer.
Correction Pages
When delivering correction pages, always adhere to the page parameters of the initial data delivery.
Only (!) deliver the corrected pages as individual PDF files.
Observe the naming convention: original document name + page number.
Only deliver completely new data for large-scale corrections.
Data formats
We need your data as a print-ready PDF (see directly below).
Created as individual pages in chronological order (starting with the title page) and combined into a single PDF file. This applies even if the cover is printed on a different material.
Questions or problems?
Are you having problems with data output or questions about spot colors or specific specifications? Our prepress colleagues will be happy to help.
The following notes are essential for the smooth use of a comprehensive address file. Addressing your mailing recipients clearly is a key component of mailing success! It would be a shame to ultimately devalue a good mailing because a few steps toward achieving this clear message were missed.
Export your addresses to our standard template! It contains clearly labeled columns. Incidentally, this correctly completed table can also fulfill all your customization needs: Address file template (.xlsx)
Data transfer
IMPORTANT! For data protection reasons, we ask you to copy the address file into a folder when sending by email, compress it with an appropriate program (e.g., zip or rar), and protect it with a password.
Please send us the password in a separate email!
Give your file a unique name!
Date (backwards: YYYY-MM-DD), order number (if applicable), customer name, job title.
Please include the following information in the subject line:
Order number (if applicable), project name, your name or company.
Example: AA-123456, Spring Catalog, Mustermann GmbH
Customizations
IMPORTANT! For data protection reasons, we ask you to copy the address file into a folder when sending by email, compress it with an appropriate program (e.g., zip or rar), and protect it with a password.
Please send us the password in a separate email!
Name your file uniquely!
Date (backwards: YYYY-MM-DD), order number (if applicable), customer name, job title.
A small compendium of the most common stumbling blocks.
What exactly is circumcision?
Bleed refers to the printable space that extends beyond the final format, right up to the immediate edge of the substrate.
To achieve a borderless print, you first print on a larger medium and then trim it to the desired size. Without this bleed, unsightly or unprofessional white bands will appear at the edges.
All elements that are to be visible up to the edge of the final format must be placed beyond this edge. In offset and digital printing, this is usually at least 3 mm on all sides for standard sizes.
In Adobe InDesign, trapping is called bleed and can be defined in the Document Setup dialog box.
Source: wikipedia.org
RGB & CMYK – What exactly is the difference?
The additive RGB color space consists of the primary colors red, green, and blue. The human eye perceives colors by mixing these three primary colors. Therefore, RGB colors are colloquially referred to as light colors or screen colors. They are primarily used in the display of screens or televisions.
The CMYK color model, in contrast, is referred to as a subtractive color model. It consists of the color components cyan, magenta, and yellow. Since the three primary colors C-M-Y cannot represent deep black, the color model is supplemented by the printing ink black/black (key). All colors can thus be represented by mixing the various color components. CMYK forms the basis for modern four-color printing and can be supplemented with spot colors such as gold, silver, or neon colors.
Colors created in RGB cannot be printed. They are automatically converted to CMYK before the printing process using stored color tables. This may result in inaccurate color results, as the RGB color space is much larger than the CMYK color space. To avoid this, we ask you to create your print data or colors for printing in CMYK.
What exactly is overprinting/knockout
With overprinting, any underlying color components are included and added to the total ink coverage. With overprinting, flashes can be avoided. With knockout, any information below the knocked-out object is ignored. This option can increase the risk of flashes.
make contact
Ready for your next project? Let's create something great together.
Responsible for Content
alpha manufactur 2.0 GmbH Photos and Graphics
alpha manufactur 2.0 GmbH
Payments
If our customer/client has mistakenly made payments to third parties on our behalf, alpha manufactur 2.0 GmbH may reclaim the money from the unauthorized recipient. In this case, the customer/client assigns its claim for reimbursement against the mistaken recipient to alpha manufactur 2.0 GmbH.
Legal Notice
alpha manufactur 2.0 GmbH assumes no liability or warranty in connection with any use of this publication or for indirect, incidental, or consequential damages arising from or resulting from the use of this website. All information published on this website is provided by alpha manufactur 2.0 GmbH to the best of its knowledge; however, no guarantee can be given for the completeness, accuracy, or timeliness of the information. To the extent permitted by law, this information does not constitute a guarantee, promise, or liability on the part of alpha manufactur 2.0 GmbH. alpha manufactur 2.0 GmbH reserves the right to change this legal notice at any time. These changes will apply at the time of your visit, and you should therefore reread this legal notice each time you visit.
Trademarks
All trademarks mentioned are the property of their respective owners.
Copyright
alpha manufactur 2.0 GmbH hereby grants you the right to access, store, and reproduce this publication subject to the following conditions:
1. This publication may only be used for informational purposes and not for sale or distribution for commercial or political purposes.
2. This publication may not be modified in any way.
3. The copyright notice must be included on every copy of this publication or parts thereof.
Data Protection
The use of contact information published in the imprint or similar information, such as postal addresses, telephone and fax numbers, and email addresses, by third parties to send unsolicited information is prohibited. Legal action against senders of so-called spam emails in the event of violations of this prohibition is expressly reserved.
For further information and notes on data protection, please refer to our Privacy Policy.
Disclaimer of Liability for Links
In its judgment of May 12, 1998 – 312 O 85/98 – the Hamburg Regional Court ruled that by providing a link, one may be held jointly responsible for the content of the linked page. According to the Hamburg Regional Court, this can only be prevented by expressly distancing oneself from this content.
Declaration
We hereby expressly distance ourselves from the content contained within the links listed by alpha manufactur 2.0 GmbH, the servers behind them, further links, and all other visible or invisible content. We are not aware of any third-party content that violates applicable law. Furthermore, alpha manufactur 2.0 GmbH assumes no liability for information, legal and organizational circumstances, content, or promises contained in linked offers.
References to other Internet publications are not to be understood as a recommendation by alpha manufactur 2.0 GmbH for the respective company, its products, or services. Anyone who discovers a provider through our links and concludes a contract of any kind with them does so at their own risk.
Consumer Information
Online Dispute Resolution pursuant to Art. 14 (1) of the ODR Regulation: The European Commission provides a platform for online dispute resolution (ODR), which can be found here: https://ec.europa.eu/consumers/odr
Shipping and payments
Shipping and Shipping Costs within Germany
Delivery is only within Germany. Products ordered today are delivered within 3-4 business days. Some of our products have specific delivery times. These are (currently) out of stock and therefore have a longer delivery time. The corresponding delivery time is displayed next to the product and in the order overview in the shopping cart.
The shipping costs depend on the packaging size and the shipping option and are calculated and displayed in the shopping cart.
Shipping abroad
Do you require delivery outside of Germany? Please contact us for the exact delivery times and shipping costs: +49 521 32 960 888 or info@am-2.de.
Payment Methods
You can pay either in advance or via PayPal.
Bank details for prepayment orders
If you have ordered using the prepayment payment method, please transfer the amount to our account after receiving the order confirmation, stating the order number:
We are very pleased about your interest in our company. Data protection is of particular importance to the management of alpha manufactur GmbH. Use of the alpha manufactur GmbH website is generally possible without providing any personal data. However, if a data subject wishes to use special services offered by our company via our website, processing of personal data may be necessary. If the processing of personal data is necessary and there is no legal basis for such processing, we generally obtain the consent of the data subject.
The processing of personal data, such as the name, address, email address, or telephone number of a data subject, is always carried out in accordance with the General Data Protection Regulation (GDPR), and in accordance with the country-specific data protection regulations applicable to alpha manufactur GmbH. By means of this privacy policy, our company would like to inform the public about the nature, scope, and purpose of the personal data we collect, use, and process. Furthermore, data subjects are informed of their rights by means of this privacy policy.
Alpha manufactur GmbH, as the controller, has implemented numerous technical and organizational measures to ensure the most complete protection possible for personal data processed via this website. Nevertheless, internet-based data transmissions may in principle have security gaps, so absolute protection cannot be guaranteed. For this reason, every data subject is free to transmit personal data to us via alternative means, for example, by telephone.
Data collection on this website
Who is responsible for data collection on this website?
Data processing on this website is carried out by the website operator. You can find their contact details in the "Note on the Controller" section of this privacy policy.
How do we collect your data?
Your data is collected, on the one hand, when you provide it to us. This may, for example, be data you enter into a contact form.
Other data is collected automatically or with your consent when you visit the website by our IT systems. This primarily includes technical data (e.g., internet browser, operating system, or time of page access). This data is collected automatically as soon as you enter this website.
What do we use your data for?
Some of the data is collected to ensure the error-free provision of the website. Other data may be used to analyze your user behavior.
What rights do you have regarding your data?
You have the right to obtain information about the origin, recipient, and purpose of your stored personal data free of charge at any time. You also have the right to request the correction or deletion of this data. If you have given your consent to data processing, you can revoke this consent at any time with effect for the future. You also have the right, under certain circumstances, to request the restriction of the processing of your personal data. Furthermore, you have the right to lodge a complaint with the responsible supervisory authority.
You can contact us at any time about this and other questions regarding data protection.
Hosting and Content Delivery Networks (CDN)
External Hosting
This website is hosted by an external service provider (hoster). The personal data collected on this website is stored on the hoster's servers. This may include, in particular, IP addresses, contact requests, meta and communication data, contract data, contact details, names, website accesses, and other data generated via a website.
The hoster is used for the purpose of fulfilling the contract with our potential and existing customers (Art. 6 (1) (b) GDPR) and in the interest of a secure, fast, and efficient provision of our online offering by a professional provider (Art. 6 (1) (f) GDPR).
Our hoster will only process your data to the extent necessary to fulfill its service obligations and will follow our instructions regarding this data.
We use the following hoster:
STRATO AG, Pascalstraße 10, 10587 Berlin
Conclusion of a data processing agreement
To ensure data protection-compliant processing, we have concluded a data processing agreement with our hoster.
General information and Mandatory Information
Data Protection
The operators of these pages take the protection of your personal data very seriously. We treat your personal data confidentially and in accordance with the statutory data protection regulations and this privacy policy.
When you use this website, various personal data is collected. Personal data is data with which you can be personally identified. This privacy policy explains which data we collect and what we use it for. It also explains how and for what purpose this is done.
We point out that data transmission over the Internet (e.g., when communicating by email) can have security gaps. Complete protection of data from access by third parties is not possible.
Note on the responsible party
The responsible party for data processing on this website is:
The responsible party is the natural or legal person who, alone or jointly with others, decides on the purposes and means of processing personal data (e.g., names, email addresses, etc.).
Storage Period
Unless a more specific storage period is specified within this privacy policy, your personal data will remain with us until the purpose for data processing no longer applies. If you assert a legitimate request for deletion or revoke your consent to data processing, your data will be deleted unless we have other legally permissible reasons for storing your personal data (e.g., retention periods under tax or commercial law); in the latter case, deletion will occur once these reasons no longer apply.
Note on data transfer to the USA and other third countries
Our website includes tools from companies based in the USA or other third countries that are not secure in terms of data protection law. If these tools are active, your personal data may be transferred to these third countries and processed there. We would like to point out that a level of data protection comparable to that in the EU cannot be guaranteed in these countries. For example, US companies are obligated to disclose personal data to security authorities without you, as the data subject, being able to take legal action. It cannot therefore be ruled out that US authorities (e.g., intelligence agencies) may process, evaluate, and permanently store your data stored on US servers for surveillance purposes. We have no influence over these processing activities.
Revocation of your consent to data processing
Many data processing operations are only possible with your express consent. You can revoke your consent at any time. The legality of the data processing carried out up to the time of revocation remains unaffected by the revocation.
Right to object to data collection in special cases and to direct marketing (Article 21 GDPR)
If data processing is based on Article 6 (1) (e) or (f) GDPR, you have the right to object to the processing of your personal data at any time, on grounds relating to your particular situation; this also applies to profiling based on these provisions.
The respective legal basis on which processing is based can be found in this Privacy Policy. If you object, we will no longer process your personal data unless we can demonstrate compelling legitimate grounds for the processing that override your interests, rights, and freedoms, or the processing serves to assert, exercise, or defend legal claims (objection pursuant to Article 21 (1) GDPR).
If your personal data is processed for direct marketing purposes, you have the right to object at any time to the processing of personal data concerning you for the purposes of such advertising; This also applies to profiling insofar as it is related to such direct marketing. If you object, your personal data will subsequently no longer be used for direct marketing purposes (objection pursuant to Art. 21 (2) GDPR).
Right to lodge a complaint with the competent supervisory authority
In the event of violations of the GDPR, data subjects have the right to lodge a complaint with a supervisory authority, in particular in the Member State of their habitual residence, place of work, or place of the alleged violation. This right to lodge a complaint is without prejudice to other administrative or judicial remedies.
Right to data portability
You have the right to have data that we process automatically based on your consent or in fulfillment of a contract handed over to you or to a third party in a common, machine-readable format. If you request the direct transfer of the data to another controller, this will only be done if technically feasible.
SSL or TLS Encryption
For security reasons and to protect the transmission of confidential content, such as orders or inquiries that you send to us as the site operator, this website uses SSL or TLS encryption. You can recognize an encrypted connection by the fact that the browser's address line changes from "https://" to "https://" and by the lock symbol in your browser bar.
If SSL or TLS encryption is activated, the data you transmit to us cannot be read by third parties.
Encrypted payment transactions on this website
If, after concluding a paid contract, you are required to provide us with your payment details (e.g., account number for direct debit authorization), this data will be required for payment processing.
Payment transactions using common payment methods (Visa/MasterCard, direct debit) are carried out exclusively via an encrypted SSL or TLS connection. You can recognize an encrypted connection by the fact that the browser's address line changes from "https://" to "https://" and by the lock symbol in your browser bar.
With encrypted communication, your payment details that you transmit to us cannot be read by third parties.
Information, blocking, deletion
Within the scope of applicable legal provisions, you have the right at any time to obtain free information about your stored personal data, its origin and recipient, and the purpose of data processing, as well as, if applicable, the right to correct, block, or delete this data. You can contact us at any time at the address provided in the imprint for this purpose and for other questions regarding personal data.
Objection to advertising emails
The use of contact data published in accordance with the imprint obligation to send unsolicited advertising and information materials is hereby prohibited. The operators of the website expressly reserve the right to take legal action in the event of unsolicited advertising information being sent, for example, through spam emails.
Right to restriction of processing
You have the right to request that the processing of your personal data be restricted. You can contact us at any time for this purpose. The right to restriction of processing exists in the following cases:
If you dispute the accuracy of your personal data stored by us, we generally need time to verify this. You have the right to request that the processing of your personal data be restricted for the duration of the verification.
If the processing of your personal data was/is unlawful, you can request that the processing be restricted instead of deleted.
If we no longer need your personal data, but you require it to exercise, defend, or assert legal claims, you have the right to request that the processing of your personal data be restricted instead of deleted.
If you have lodged an objection pursuant to Art. 21 (1) GDPR, a balance must be struck between your interests and ours. As long as it is not yet clear whose interests prevail, you have the right to request that the processing of your personal data be restricted.
If you have restricted the processing of your personal data, this data – apart from its storage – may only be processed with your consent or for the establishment, exercise, or defense of legal claims or to protect the rights of another natural or legal person, or for reasons of important public interest of the European Union or a Member State.
Data collection on this website
Cookies
Our website uses so-called "cookies." Cookies are small text files and do not cause any damage to your device. They are stored either temporarily for the duration of a session (session cookies) or permanently (permanent cookies) on your device. Session cookies are automatically deleted after your visit. Persistent cookies remain stored on your device until you delete them yourself or they are automatically deleted by your web browser.
Sometimes, cookies from third-party companies may also be stored on your device when you visit our site (third-party cookies). These enable us or you to use certain services provided by the third-party company (e.g., cookies for processing payment services).
Cookies have various functions. Many cookies are technically necessary because certain website functions would not work without them (e.g., the shopping cart function or the display of videos). Other cookies are used to evaluate user behavior or display advertising.
Cookies that are required to carry out electronic communication (necessary cookies) or to provide certain functions you have requested (functional cookies, e.g., for the shopping cart function) or to optimize the website (e.g., cookies for measuring web audience) are stored on the basis of Art. 6 (1) (f) GDPR, unless another legal basis is specified. The website operator has a legitimate interest in storing cookies to ensure the technically error-free and optimized provision of its services. If consent to the storage of cookies has been requested, the cookies in question will be stored exclusively on the basis of this consent (Art. 6 (1) (a) GDPR); this consent can be revoked at any time.
You can set your browser to inform you about the use of cookies and to only allow cookies in individual cases, to exclude the acceptance of cookies for certain cases or generally, and to activate the automatic deletion of cookies when closing the browser. Deactivating cookies may limit the functionality of this website.
If cookies are used by third-party companies or for analysis purposes, we will inform you separately within the framework of this privacy policy and, if necessary, request your consent.
Server log files
The website provider automatically collects and stores information in so-called server log files, which your browser automatically transmits to us. These are:
Browser type and version
Operating system used
Referrer URL
Host name of the accessing computer
Time of the server request
IP address
This data will not be merged with other data sources.
This data is collected on the basis of Art. 6 (1) (f) GDPR. The website operator has a legitimate interest in the technically error-free presentation and optimization of its website – for this purpose, the server log files must be collected.
When using this general data and information, alpha manufactur GmbH does not draw any conclusions about the data subject. Rather, this information is required to (1) correctly deliver the content of our website, (2) optimize the content of our website and its advertising, (3) ensure the long-term functionality of our information technology systems and website technology, and (4) provide law enforcement authorities with the information necessary for prosecution in the event of a cyberattack. Alpha manufactur GmbH therefore evaluates this anonymously collected data and information both statistically and with the aim of increasing data protection and data security within our company, ultimately ensuring an optimal level of protection for the personal data we process. The anonymous data in the server log files are stored separately from all personal data provided by a data subject.
Processing of data (customer and contract data)
We collect, process, and use personal data only to the extent necessary for the establishment, content design, or modification of the legal relationship (master data). This is done on the basis of Art. 6 (1) (b) GDPR, which permits the processing of data to fulfill a contract or for pre-contractual measures. We collect, process, and use personal data about the use of our website (usage data) only to the extent necessary to enable or bill the user for the use of the service.
The collected customer data will be deleted after completion of the order or termination of the business relationship.
Statutory retention periods remain unaffected.
Data transfer upon conclusion of contract for online shops, retailers, and shipping of goods
We only transfer personal data to third parties if this is necessary for the purpose of contract processing, for example, to the company entrusted with the delivery of the goods or the credit institution commissioned with payment processing. Further transmission of data will not occur or only if you have expressly consented to the transmission. Your data will not be passed on to third parties without your express consent. , for example, for advertising purposes, does not occur.
The basis for data processing is Art. 6 (1) (b) GDPR, which permits the processing of data to fulfill a contract or pre-contractual measures.
Data transfer upon conclusion of a contract for services and digital content
We only transfer personal data to third parties if this is necessary for the execution of the contract, for example, to the credit institution commissioned with payment processing.
The data will not be transferred to any other party or only if you have expressly consented to the transfer. Your data will not be passed on to third parties without your express consent, for example for advertising purposes.
The basis for data processing is Art. 6 (1) (b) GDPR, which permits the processing of data to fulfill a contract or pre-contractual measures.
Inquiry by email, telephone, or fax
If you contact us by email, telephone, or fax, your inquiry, including all personal data resulting from it (name, inquiry), will be stored and processed by us for the purpose of processing your request. We will not disclose this data without your consent.
This data will be processed on the basis of Art. 6 (1) (b) GDPR if your inquiry is related to the fulfillment of a contract or is necessary to carry out pre-contractual measures. In all other cases, the processing is based on our legitimate interest in the effective processing of inquiries addressed to us (Art. 6 (1) (f) GDPR) or on your consent (Art. 6 (1) (a) GDPR), if this was requested.
The data you send to us via contact inquiries will remain with us until you request deletion, revoke your consent to storage, or the purpose for storing the data no longer applies (e.g., after your request has been processed). Mandatory legal provisions – in particular statutory retention periods – remain unaffected.
Analysis Tools and Advertising
WordPress Statistics
This website uses "WordPress Statistics" to statistically evaluate visitor access. The provider is Automattic Inc., 60 29th Street #343, San Francisco, CA 94110-4929, USA.
WordPress Statistics uses technologies that enable user recognition for the purpose of analyzing user behavior (e.g., cookies or device fingerprinting). WordPress Statistics records, among other things, log files (referrer, IP address, browser, etc.), the origin of website visitors (country, city), and the actions they performed on the site (e.g., clicks, views, downloads). The information collected in this way about the use of this website is stored on servers in the USA. Your IP address is anonymized after processing and before storage.
This analysis tool is used on the basis of Art. 6 (1) (f) GDPR. The website operator has a legitimate interest in the anonymized analysis of user behavior in order to optimize both its website and its advertising. If corresponding consent has been requested (e.g., consent to the storage of cookies), processing is carried out exclusively on the basis of Art. 6 (1) (a) GDPR; consent can be revoked at any time.
Plugins and Tools
YouTube
This website embeds videos from the YouTube website. The website operator is Google Ireland Limited ("Google"), Gordon House, Barrow Street, Dublin 4, Ireland.
When you visit one of our websites that integrate YouTube, a connection to the YouTube servers is established. The YouTube server is informed which of our pages you have visited.
Furthermore, YouTube may store various cookies on your device or use similar technologies for recognition (e.g., device fingerprinting). This allows YouTube to obtain information about visitors to this website. This information is used, among other things, to collect video statistics, improve user-friendliness, and prevent fraud attempts.
If you are logged into your YouTube account, you allow YouTube to directly associate your browsing behavior with your personal profile. You can prevent this by logging out of your YouTube account.
YouTube is used in the interest of an appealing presentation of our online offerings. This represents a legitimate interest within the meaning of Art. 6 (1) (f) GDPR. If consent has been requested, processing will be carried out exclusively on the basis of Art. 6 (1) (a) GDPR; consent can be revoked at any time.
Further information on how user data is handled can be found in YouTube's privacy policy at: https://policies.google.com/privacy?hl=de.
Facebook
The controller has integrated components of the Facebook company on this website. Facebook is a social network.
A social network is a social meeting place operated on the Internet, an online community that generally enables users to communicate with each other and interact in virtual space. A social network can serve as a platform for exchanging opinions and experiences or allows the internet community to provide personal or company-related information. Facebook enables users of the social network, among other things, to create private profiles, upload photos, and network via friend requests.
The operating company of Facebook is Facebook, Inc., 1 Hacker Way, Menlo Park, CA 94025, USA. If a data subject lives outside the USA or Canada, the controller responsible for processing personal data is Facebook Ireland Ltd., 4 Grand Canal Square, Grand Canal Harbour, Dublin 2, Ireland.
Each time one of the individual pages of this website, which is operated by the controller and on which a Facebook component (Facebook plug-in) has been integrated, is accessed, the Internet browser on the information technology system of the data subject is automatically prompted by the respective Facebook component to download a display of the corresponding Facebook component from Facebook. A complete overview of all Facebook plug-ins can be found at https://developers.facebook.com/docs/plugins/?locale=de_DE. As part of this technical process, Facebook receives information about which specific subpage of our website was visited by the data subject.
If the data subject is logged in to Facebook at the same time, Facebook recognizes which specific subpage of our website the data subject visits with each visit to our website by the data subject and for the entire duration of their stay on our website. This information is collected by the Facebook component and assigned by Facebook to the respective Facebook account of the data subject. If the data subject clicks on one of the Facebook buttons integrated on our website, for example the "Like" button, or if the data subject makes a comment, Facebook assigns this information to the personal Facebook user account of the data subject and stores the personal data.
Facebook always receives information via the Facebook component that the data subject has visited our website, provided that the data subject is logged in to Facebook at the same time as accessing our website; this occurs regardless of whether the data subject clicks on the Facebook component or not. If the data subject does not want this information to be transmitted to Facebook, they can prevent it by logging out of their Facebook account before accessing our website.
The data policy published by Facebook, which is available at https://de-de.facebook.com/about/privacy/, provides information about the collection, processing, and use of personal data by Facebook. It also explains which settings options Facebook offers to protect the privacy of the data subject. In addition, various applications are available that allow the suppression of data transmission to Facebook. Such applications can be used by the data subject to suppress data transmission to Facebook.
Instagram
The controller has integrated components of the Instagram service on this website. Instagram is a service that qualifies as an audiovisual platform and allows users to share photos and videos and also to further disseminate such data on other social networks.
The operating company of the Instagram services is Facebook Ireland Ltd., 4 Grand Canal Square, Grand Canal Harbour, Dublin 2, Ireland.
With each visit to one of the individual pages of this website, which is operated by the controller and on which an Instagram component (Insta button) has been integrated, the internet browser on the information technology system of the data subject is automatically prompted by the respective Instagram component to download a display of the corresponding Instagram component. As part of this technical process, Instagram receives information about which specific subpage of our website was visited by the data subject.
If the data subjectIf the person is logged in to Instagram at the same time, Instagram recognizes which specific subpage the data subject visits with each visit to our website by the data subject, and for the entire duration of their stay on our website. This information is collected by the Instagram component and assigned by Instagram to the respective Instagram account of the data subject. If the data subject clicks one of the Instagram buttons integrated on our website, the data and information transmitted with it are assigned to the personal Instagram user account of the data subject and stored and processed by Instagram.
Instagram always receives information via the Instagram component that the data subject has visited our website whenever the data subject is logged in to Instagram at the same time as accessing our website; this occurs regardless of whether the data subject clicks on the Instagram component or not. If the data subject does not want this information to be transmitted to Instagram, they can prevent this by logging out of their Instagram account before accessing our website.
Further information and Instagram's applicable privacy policy can be found at https://help.instagram.com/155833707900388 and https://www.instagram.com/about/legal/privacy/.
Payment provider
PayPal
On our website, we offer payment via PayPal, among other options. The provider of this payment service is PayPal (Europe) S.à.r.l. et Cie, S.C.A., 22-24 Boulevard Royal, L-2449 Luxembourg (hereinafter "PayPal").
If you choose to pay via PayPal, the payment data you enter will be transmitted to PayPal.
The transmission of your data to PayPal is based on Art. 6 (1) (a) GDPR (consent) and Art. 6 (1) (b) GDPR (processing for the performance of a contract). You have the option of revoking your consent to data processing at any time. A revocation does not affect the validity of past data processing operations.
Paypal's current privacy policy can be found at https://www.paypal.com/de/webapps/mpp/ua/privacy-full.
Cancellation policy
Right of Withdrawal
You have the right to withdraw from this contract within fourteen days without giving any reason.
The withdrawal period shall be fourteen days from the day on which you or a third party other than the carrier designated by you takes possession of the last goods.
To exercise your right of withdrawal, you must notify us (alpha manufactur 2.0 GmbH | Elpke 110 | 33605 Bielefeld, T +49 521 32 960 888, Email: info@am-2.de) of your decision to withdraw from this contract by means of a clear statement (e.g., a letter sent by post or email). You may use the attached model withdrawal form for this purpose, but this is not mandatory.
To comply with the withdrawal period, it is sufficient that you send your notification of the exercise of the right of withdrawal before the expiry of the withdrawal period.
Consequences of Cancellation
If you cancel this contract, we will refund all payments we have received from you, including delivery costs (with the exception of additional costs resulting from your choice of a delivery method other than the cheapest standard delivery offered by us), promptly and at the latest within fourteen days from the date on which we received notification of your cancellation of this contract. For this refund, we will use the same means of payment that you used for the original transaction, unless something else was expressly agreed with you; under no circumstances will you be charged any fees for this refund. We may refuse to refund until we have received the goods back or until you have provided proof that you have returned the goods, whichever is earlier.
You must return or hand over the goods to us promptly and in any event no later than fourteen days from the date on which you notify us of the cancellation of this contract. The deadline is met if you send the goods before the expiry of the fourteen-day period.
You will bear the direct cost of returning the goods. You only have to pay for any loss of value of the goods if this loss of value is due to handling of the goods that is not necessary to check their quality, properties, and functioning.
Exclusion or premature expiration of the right of withdrawal
The right of withdrawal does not apply to contracts for the delivery of goods that are not prefabricated and for whose production an individual selection or determination by the consumer is decisive, or which are clearly tailored to the personal needs of the consumer.
General information
1. Please avoid damage to or contamination of the goods. Please return the goods to us in their original packaging with all accessories and packaging components. If necessary, use protective outer packaging. If you no longer have the original packaging, please ensure that you use suitable packaging to adequately protect them against transport damage.
2. Please do not return the goods to us freight collect.
3. Please note that the aforementioned clauses 1-2 are not a prerequisite for the effective exercise of the right of withdrawal.
Withdrawal form
If you wish to withdraw from the contract, please fill out this form and return it.
To
alpha manufactur 2.0 GmbH
Elpke 110
33605 Bielefeld
Email: info@am-2.de
I/we (*) hereby revoke the contract concluded by me/us (*) for the purchase of the following goods (*)/the provision of the following service (*)